
Back for Papertrey Ink's second design team countdown post... yay!

The set we're focusing on today is super sweet and right in line with what I think of as "classic" Papertrey...
Stitches & Swirls.
And then I went and did something all NOT classic.
Or, at least, it's all new to me :)

Do you like it? I hope so.
I'm always trying to stretch my resources... figure out new ways to use what I already have and that sort of thing. In terms of crafting supplies, other than my Papertrey items, I don't tend to accumulate much.
I know... kinda weird for a paper crafter, right?
:)
I just really like to stretch myself by figuring out something new to do with something old.
In this case, the old would be just basic stamps although, yes, the design is new :)
Instead of going for my standard stamped card, I started off with a small, gallery wrapped canvas.
Just a simple one that you can pick up at your local craft store will do.
I stamped a few of the Stitches & Swirls images right on top.
Looks pretty awesome... right?
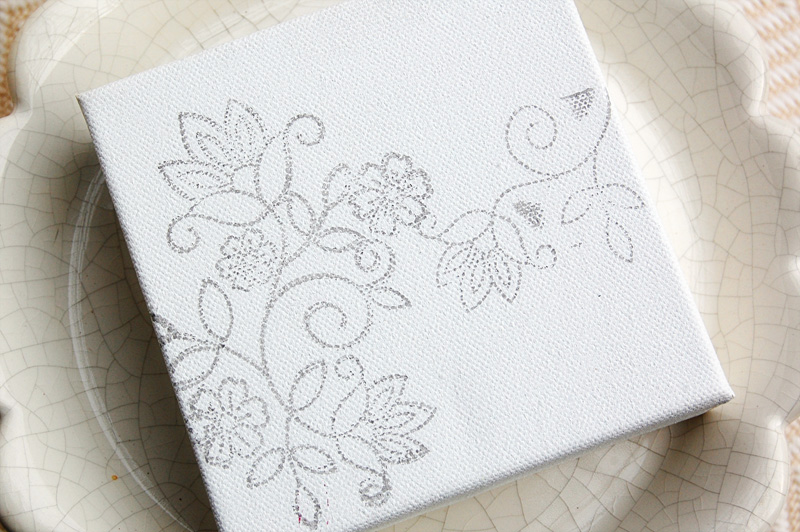
Um... no.
Important (and freeing) to note that we're going to be painting over everything later, so guess what?
No perfect stamping required!
Did you hear me??
This is a NO PERFECTION project :)
Basically, we're just looking to use the stamped image as an outline.
I found it easiest to forgo the acrylic block when stamping and just press the image onto the canvas with my fingers. Because the canvas is, obviously, fabric and it has both places of being backed by the frame and places without a backing, it's hard to get all of the areas stamped down when using a block.
For the next step, we're going to add some sort of 3D liquid.
After a little trial of the 4 types of liquid glue that I own (Scotch Quick Dry, Beacon Felt Glue, and Beacon Gem Tac) as well as trying some fabric puffy paint, I found I got the best results with the Glossy Accents.

Basically, you just want to go over your stamped image with the glue or paint. I tried it on scratch paper and determined that the other options tended to flatten out and run together a bit more than the Glossy Accents. Use whatever you have... remember? This is a NO PERFECTION project :)
The only note I'd make is that if you're wondering why I didn't just stamp the image and heat emboss it with some ultra thick powder... I can tell you that it really does not give the same result. You can see that when stamping on a canvas, the stamped images likely won't be clear, causing the embossing to be messy. Also, liquid glue offeres a lot more depth to the project.
I did notice on my practice sheet that the smaller flowers (the round flowers) were a bit more tricky, so I just eliminated those. I took a few other liberties here and there with adding loops, taking away details, etc. You can also see that I tried to use thicker lines of glue where I had a bit more space to work with and scaled back to thinner lines for smaller images and spaces.
At the bottom I added some simple letters to spell out my daugher's current nickname :)

I set my little Lulu project aside for a few hours to let everything dry. Because I used a dye based ink to stamp my images, at this point I was able to rub off the extra images with a damp paper towel. My canvas happened to be primed first with gesso, so the excess ink came off with just a swipe of the towl.
Finally, I spray painted the whole shebang.
I know... it's still white :)
But the glue dries clear, not white, plus you can see all of the ink underneath the glue, so spray paint is the secret weapon in this project.
I started with a white primer for plastic (since the letters I used were plastic). Basically, I already had it, so I went ahead and used it. This project is going to be hung up in Noelle's room, so it will only be handled rarely. Because of that, I would have felt fine using regular spray paint on it, but like I said, I already had the primer, so I used it. After a light coat of that, it got a light coat of glossy white spray paint.
I love how the white really allows the texture and the raised images to take center stage.
Plus, it has the vintage meets modern feel that I love for Noelle's {future} room.
That is one of those projects that has grand plans, but no start date.
Soon and very soon, though :)

So, there you have it... a non-classic take on what I think might become a PTI classic :)
The technique itself can be applied to lots of different images. I was saving this idea for some countdown images that I knew I could use in Lulu's room, so I am loving the results! What do you think?
I'm sure the other design team gals have come up with some stunners... can't wait to check out what everyone else saw in Stitches & Swirls!
Nichole Heady
Betsy Veldman
Erin Lincoln
Maile Belles
Lisa Johnson
Dawn McVey
Heather Nichols
Melissa Phillilps
Michelle Wooderson
Danielle Flanders
Thanks for stopping by!
Later!

{Lulu} canvas
Stamps - Stitches & Swirls
Ink - Smokey Shadow
Other - Glossy Accents, wrapped canvas, spray paint primer for plastic, glossy white spray paint


28 comments:
I think you are amazing Jess...always so creative and inspiring!
Melis
This is really stunning. It almost looks as if the design is carved out in some of the shots. super clever idea.
TFS
Ang
LOVE this! I might muster up the courage to give this technique a try.
Beautiful project! and i am like you, I dont like to accumulate lots of crafty stuffs, I like to stretch myself and use what I have in a creative way, and I am noticing that I am learning a lot by doing so! Thanks for sharing!
So pretty, Jess. I love it! Thanks so much for continually sharing your amazing talent!
Fabulous!!!
The picture gives the illusion of an embossed image. Is it? I guess trying out this technique is the only way to tell. Very unique, thanks for sharing.
Marcie
Absolutely beautiful project Jessica!! I just love it!!
Positively Awesome!!!!
Oh my gosh, love, love, love! Great way to think out of the box - the modern vintage is wonderful.
I loooove this .... your creativity is astounding and fabulous ... thank you so much for sharing!
So very creative, thanks for sharing your ideas!
This is a very clever creation. I like it's simplicity, but I think my eyes are playing tricks on me. So, what looks down is up and what looks up is down? To my eyes, it does seem like the pattern is carved, rather than raised. I also don't see 3D at the movies. Thanks so much for sharing this. I may have to try it just to figure out what I'm seeing.
whow so creative ...great inspiration!
Genius. That is all. Pure genius.
Love. this.
You always inspire me!
Have a fantastic day!
Amazing what a simply delightful project :o)
This is such a cool project! It also looks carved out to me instead of raised, until I look at the "lulu" in the corner. Then I can see that it is raised. If I look away and just look at the flowers again, it appears carved out. It's one of those optical illusions that you can only see when you "reset" your eyes by looking at "lulu". Very cool.
Wow, Jess, this is awesome! I have to try this. Thank you for the idea. Super cool!
I love how your brain thinks! and I appreciate you try to do more with less, tends to be my philosophy in life however this crafting world has tempted me into buying waaaay too many supplies!! love this
This is absolutely amazing!! I really want to try this out now! Thanks for the inspiration ;o)
you are crazy cool and creative...just crazy cool!
love it, love it, love it. what a crafting genius you are!
Wow! You are certainly one clever lady. Looks great!
STUNNING a masterpiece!
Love it! and want to try this out! too pretty.
It's a modern classic!
WOW this is absolutely AMAZING! What a grand project! Thank you so very much for the step by step instructions! I'm going to have to give this a shot! Thanks again! Beautiful work!
Hugs~ Kim
Post a Comment