
It's the 15th and what does that mean to me?
It's time for the marathon of all marathon posts... Papertrey Ink's March release in review post!
All current products are linked at the bottom in the supply lists; new products are available starting tonight at 10pm (EST).
Let's jump on in with this little cutie using the new Little Bitty Bird Additions...

Sweet, right? I could not have been happier to see this little nest and Just Hatched sentiment in this new set. It makes the perfect cardlet to go along with my bird's nest necklace gifts! I jumped on right on the bird's nest necklace bandwagon this Christmas during one heckuva long road trip to Denver. {A girl's gotta have something to focus on in order to make it through 14 hours in the car with all of her angelic ;) children.}
Sarah Ortega has a lovely tutorial for the necklaces right here. I've followed her directions for all of the necklaces I've made and have always been super happy with how they've come out. They really are super simple... if you've never attempted jewelry making before, this is a great intro project.

I like to package my necklaces up by nestling them in a nest of shredded paper and slipping them in a glassine bag. I made this little mini card with the glassine bag in mind... the Movers and Shakers: Zipper dies work perfectly to make little card fronts with the paper zipper detail, plus it fits neatly in PTI's medium glassine bags.

Classic Kraft made a nice light tree branch; I stamped the nest in Dark Chocolate to make it stand out a little more. I added a few touches of color with Copics... nothing difficult.
The zipper die cut serves as the top layer of the card - I adhered a strip of linen fabric to the actual card base and stamped the "sweet birthday" sentiments from the original Little Bitty Bird set there. The die cut layer goes on top so that the sentiment is revealed when you pull the tab. I think the texture underneath add just a bit of sophistication.

The card slips in the bag first, then the paper with the necklace on top.
This is an impressive but cost effective gift for new mommies... I even made one for a friend who recently added to her nest by adopting a teenager! I think it's nice for moms to get a gift just for themselves... not for baby :)

Love how you get a glimpse of the gift through the bag :)
Moving on to our next project.
Remember this little guy?
There's more to him than meet's the eye...

Sneaky, huh?
The back side of the bag holds a little thank you tag using the new Tremendous Treats: Birthday set! I mean... come on... that cupcake was MADE to go with this bag!

I inked the cupcake up with Classic Kraft ink then used a baby wipe to clean off the star image. I just had to add a little heart die cut (from Love Lives Here) to make it match my little baked goods :)
The thank you sentiment comes from (of course!) Cupcake Collection. I set the cupcake layer down onto a another linen covered tag (Tag Sale #6) and added the Tremendous Treats sentiment at the bottom... so perfect. The crafting stars of the world were alligned with this one :)

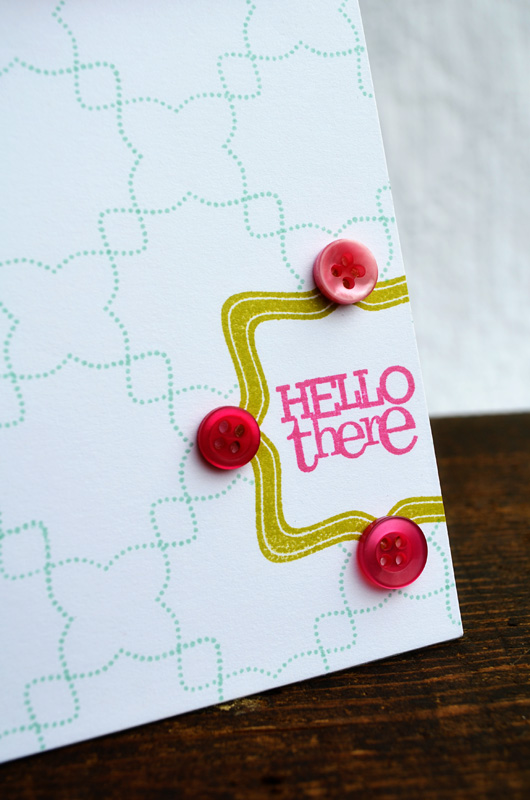
Next up... Framed Out #2.
Totally loving all the pattern making options with this set! The larger frame makes bold patterns and the smaller dotted frame makes delicate and sweet patterns... this one reminds me of a quilt!

I originally added a button to each of the flower-like sections but I just had to take them off... they seemed to overwhelm the pattern and I kind think the pattern is the star of the show here :)
I started the pattern off by stamping the frame and sentiment, then masking them with a die-cut frame (leave the inside of the frame in the die cut so that the sentiment is completely covered). I stamped right over each corner of the mask with the dotted frame to get the pattern going. I like that your eye has a break from the pattern over the sentiment.
I did two cards like this with no measuring, no marking, and no mistakes, so it must be pretty easy :)
I have bit of a non-traditional card up next...

What? Your guy wouldn't want a card featuring pink ties??
Shocking :)
This one is a bit of an inside joke involving my love of preppy ties involving purple, pink, etc, and Brian's, ahem, non-love of them :) There are several hanging up in our closet... just waiting for the moment when the will make their preppy appearance to the world. I predict that that day will be Easter. Mark my words, folks.
I used the Tie die (yeah... that makes me giggle every time) to cut 5 ties - one from cardstock and 2 from each of the Raspberry Fizz patterned papers. I stamped the center tie with one of the World's Greatest images, then created the other two ties by cutting the knot off of one of the ties and popping it onto the base tie. Doing that lets you turn the pattern which give it that realistic look of a change in pattern direction like a real tie has.

I paired my ties (look... yet another tie pun!) with the Grid Lines cardstock and new Edgers #5 dies for an office-y feel. I added the extra sentiment from Mat Stack 5 Collection since, as the man who holds down the fort during my release project marathoning, he's owed a thank you card at the very least :)
I've got one more card guys happening, althought this one would be great for any golf fan, really. This one features the new On the Links set (I think that name is so cute!). I couldn't resist... I pulled out another Movers & Shakers die from last month. This one just demanded the use of the Spinners die, right?

This card is a little bit different from the typical way you would set up the slider in that the felt "green" is covering up part of the die cut so that the ball can really roll along the green. In order to make that happen, I esentially gave the golf ball a taller base - I used 5 or 6 little circle die cuts (from the Movers & Shakers: Spinners die set) in between the front and back layers. You would normall use two little circles there, so just add a few more.
So the golf ball sandwich is just the golf ball image cut out with a circle punch, the 5 small circles adhered beneath that, then another punched circle adhered to the bottom. That gives you plenty of room between the two larger circles to slip it behind the die cut slider and over the green. Before you glue that front layer down, be sure to stamp the flag pole on both layers!

I actually pulled out the Tie die again for the flag and just trimmed it down to make a flag that fit the sentiment :)
Here's a cheerful little one for you...

If there is a sentiment in a set that says anything referring to sun or sunshine... yup... I'll pick it every darned time. I'm kinda predictable like that :)
I paired the Sun Image From Back Pocket Basics with the pocket image to complement the sentiment. The sun ray image from Nativity Silhouettes totally adds to the sunshine effect, right?

I added a Summer Sunrise button to the center to really bring your eye straight to the center. I kept the pocket simple by adding the stamped stitching embellishment and little sunshine tag to the side.
Love the bright and happy feeling on this one :)
And speaking of bright and happy...
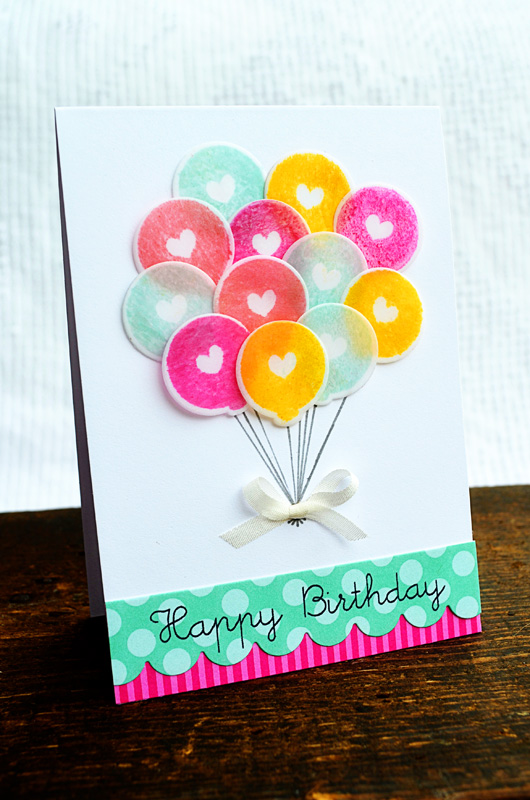
I made this little cutie with the new Heart-to-Heart #2 set. This installment features 3 sweet little balloon images. Of course, I went with the heart balloon :) I wanted to keep the transulcent feel of a real balloon so I die cut a dozen balloons out of vellum instead of cardstock. I was able to cut two vellum layers at a time with no problem, so it went fast.
The balloons are stamped with Summer Sunrise, Raspberry Fizz, Aqua Mist, and Berry Sorbet. I kept layering them until I had a pleasing bunch.
I had already adhered the balloons down when it came time to add some strings so I just drew them in with a gray marker and a straight edge. A little silk ribbon bow at the bottom keeps them all together ;)

Whew! That's all from me, folks! But you're in luck because there's lots more March release goodies from each of the design team members...
Nichole Heady
Danielle Flanders
Thanks for stopping by! And thanks a million for all of the sweet comments you've left this week :)
You guys are always so kind... just wanted to let you know that I appreciate you :)

Thanks for stopping by! And thanks a million for all of the sweet comments you've left this week :)
You guys are always so kind... just wanted to let you know that I appreciate you :)
{Just Hatched} gift card
Supplies not available now but available 3/15:
Stamps - Little Bitty Bird Additions
Supplies available now:
 |  |  |  |  |  |
 |  |  |  |
{Eat Cake!} card
Supplies not available now but available 3/15:
Stamps - Tremendous Treats: Birthday
Dies - Tag Sale #6
Supplies available now:
 | |  | | |  |
 |  |

{Hello There} card
Supplies not available now but available 3/15:
Stamps - Framed Out #2
Dies - Framed Out #2
Supplies available now:

{Wonderful Husband} card
Dies - Framed Out #2
Supplies available now:
 | | |  |  |  |
Supplies not available now but available 3/15:
Stamps - World's Greatest
Dies - Tie, Edgers #5 Collection
Supplies available now:
Dies - Tie, Edgers #5 Collection
Supplies available now:
 |  | |
Other Supplies: Ink - Going Gray marker (SU), Magenta (ColorBox)
{Go Fore It!} card
Supplies not available now but available 3/15: Stamps - On the Links
Supplies available now:
 | | |  |  |  |
 |
 {Pocketful of Sunshine} card
Supplies not available now but available 3/15:
Stamps - Back Pocket Basics
Ink - Harvest Gold
Dies - Back Pocket Basics
Supplies available now:

Ink - Harvest Gold
Dies - Back Pocket Basics
Supplies available now:
 | | | |  |  |
| |
{Birthday Balloons} card
Supplies not available now but available 3/15:
Stamps - Heart-to-Heart #2
Dies - Heart-to-Heart #2
Supplies available now:
Dies - Heart-to-Heart #2
Supplies available now:
| |  | | | |  |
| |  |  |


18 comments:
I don't always leave comments but had to today...
WOW!!!
That pocketful card is STUNNING!!
I mean pick-my-jaw-off-the-floor stunning.
So bright...so cheerful...
I die!
I think you just sold me the nativity set because of that card...
I just die!
And then the H2H balloons...
again...
DIE!!
Just amazing projects this month...
thank you so much for all the incredibly yummy eye candy and inspiration! :)
I TOTALLY love all of these! I don't even know where to begin!! The pocket full of sunshine is so cute and happy - those birthday balloons are so cool (love that you used vellum!) the golf spinner? um BRILLIANT! :). I love that you made the ties with the knot going in the different direction - I too, have some of those preppy ties stashed away for my husband! Some day. That little necklace is such a sweet idea...might have to borrow that! :) Thanks for the amazing inspiration :)
Fantastic work! Love the vellum, but what adhesive do you recommend? I generally only use vellum when I can hide the adhesive in a frame as I don't like the way glue shows through. Can't see any on your balloons. :-)
Really like your idea to use vellum for the balloons, so bright and colorful!!!
I love your cards and the jewelry... and that golf card. I'm not a fan of golf but I really like that idea!
WOW-OH-WOW!! =)
This is the SECOND post this week that you have just BLOWN me away with your crafty YUMMIES!! =)
I LOVE all of your cards!! What a GREAT way to use some of the stamps in a different and AMAZING way!! =) THANKS SO MUCH for sharing and have a FABULOUS WEEK!! =)
Love these!! And the use of fabric - genius!!
Oh my wow!! Stunning cards, Jess-just stunning!
Lovely! Super cool ideas. Thanks for the inspiration!
oh my WORD!! you just blew me away...BLEW me away! i LOVE, LOVE, LOVE them all! that pocketfull of sunshine REALLY makes me smile!! you rock girl!!
WOW, LOVE what you did with the square frame set :) Fabulous post - thank you :)
Hey, Jess! I missed this yesterday, but I'm so glad I came by today! That spinner golf card is amazing! So fun! I also really love your little necklace gift set! So Sweet! I will have to check out the link to the tutorial! Thanks for all the inspiration!
Wow! All your cards are stunning!!
I'm so happy that you enjoyed the bird nest tutorial, I really like the look of the gold wire that you used.
Cheers,
Sarah
Yum! Why or why are their releases always sooooo wonderful! What adorable creations, the first card might be my fav.
I think I'm wordless ...
But if I had the right words, they would be remarkable, to say the least!
Wow!
All of your projects are so creative, of course! I am waiting on my golf set and now HAVE to get the spinner die. I LOVE IT!
I am in awe of those vellum balloons-so cool!
You are an inspiration !
I have mentioned you on my blog and CASED your card for an inspiration challenge..hope you don't mind!
Thank you so much.
http://sanketij.blogspot.com/2012/03/congratulations.html
Love your cards. I love that bird's nest. I will visit and check it out. I NEVER made jewelry before. I love the balloon card using the vellum...Happy Easter.
Post a Comment