 Yeah, I'm not gonna lie... this project really about the packaging but it's also *really* about the marshmallows.
Homemade marshmallows.
I'll get back to those.
Focus, people.
So, to make a home for the lovely marshmallows and their cocoa packet partners in crime, I took a frosted bag and embossed the lower part with the Polka Dot Basics II impression plate. The bag takes the texture *so* well... love that.
 I slipped 2 cocoa packets and 5 *giant* marshamallows in said bag and made a little wrap to dress up the outside. A little die cut scalloped edge adds a little fun.
I wanted to keep the colors fun and happy since I had my kiddos in mind when I made them, so I used Summer Sunrise, New Leaf, and Rasperry Fizz to dress up the black and white tag. I stamped the extra hearts with the tiny heart from Simple Valentine.
I tied the tag to the bow with a little embroidery floss for an extra detail.
 To keep everything closed up {gotta keep those giant mallows fresh, people!} I folded the top down and stapled it shut. Then I just covered the staple with a Kraft label cut using the the Fillable Frames #11 die. It's the perfect size and shape for this little topper detail. The sentiment just finishes it out. It was super easy to ink up with 2 inks for some extra punch.
NOW... the marshmallows.
What can I say?
Were they good?
Yes.
Yes.
YES.
{And that is coming from a I'd-love-a-s'more-but-hold-the-graham-craker-and-chocolate-cause-I'll-just-take-the-toasty-marshmallow kind of girl.}
Were they easy?
Totally.
You have absolutely no excuse not to make them.
Even if you can't eat them, you should make them and give them away because they are *that fun* to make.
{If you do happen to give them away, you could always remember the lovely person who shared this recipe with you when you do so.}
I've looked at several recipes and most were very similar to one another. I used this one. I'm recommending this one because she has a video with instructions... great for a visual learner like me :)
I made mine peppermint as the link above shows because I used some of them for our Christmas party. You can totally leave that out and just go with the vanilla if you want. {Although cocoa with Peppermint Marshmallows = heaven.}
I followed the recipe exactly and beat the mixture in my Kitchen Aid for 10 minutes... next time I'll check it at 8 minutes. My mixture came out a bit stickier than the video shows, so I think I let it go a bit too long. It didn't affect the final result... it was just super sticky to get out of the bowl and into the pan. {It is possible that there was some that did not actually make it to the bowl, but I did my best to hide the evidence.}
I did not have a silicone baking pan, so I used a glass 9x9 dish. I covered the inside with cling wrap and then sprayed that down with some non-stick spray. Worked perfectly... the marshmallow just fell right out.
Ok... I'm going to admit it up front... this next part is weird. I know it, so don't bother telling me.
Does anyone remember Popples?
Those stuffed animals from the 80's where the backside was a giant pocket to stuff the animal into itself? And they "popped" back open?
Um... does anyone remember that squishing on those Popple animals felt exactly like you would imagine squishing a handful of marshmallows would feel like?
If you remember that (and I know at least one of you does because the only Popple I ever played with was owned by a childhood friend of mine who lived down the street and reads this blog - Hi, Karisa!) then you will *love* cutting into those marshmallows.
I kid you not.
Now back to our regularly scheduled projects :)
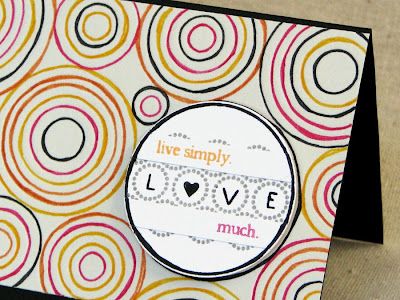
 For this card I wanted to take the Love Tags image in less Valentiney, more year round direction.
Kinda fun, right?
I've had this idea for *forever* and finally got to bust it out on this one.
I used the Sunshine impression plate on a panel of Soft Stone cardstock to give me the circle pattern. All I did after that was just use some markers to color along the lines.
Now... this is not a technique where perfectionism is your friend. You need to send your little perfectionistic side to take a nap and invite your more freewheeling adeventurous self out to play on this one.
I wanted to keep it feeling fun and not forced, so I made sure to color outside the lines and everything.
Go me!
{I know that those of you who follow along in my daily battle with perfectionism in my 10 Minute Scrap Pile Challenge on Mondays are proud, right?}
 I stamped the tag in gray and then colored directly over the gray letters with a black marker. Super simple.
I pulled an extra sentiment from the new Love Bitty Bird set and stamped it twice. I left out the "love" from "love much" since that word is highlighted in the tag image.
I added the two sentiment strips to the tag and then I got a little fearless... I inked up a few spots on the outer edge of the tag and restamped it to add the black circle edge to the sentiment strips.
And it *worked!*
Perfectly.
The first time.
All hail clear stamps.
They so rock.
 I love how the white tag just pops against the Soft Stone background and all those circles :)
This card makes me happy because I know I wouldn't have been able to make it a year ago. I would have thought it was too messy and not perfect enough and yada yada yada. Now I can make something fun and enjoy an intentionally less-than-perfect-but-still-super-cool outcome.
For more super cool Love Tags projects, I'm sure you'll find some from each and every one of these sweet girls...
Betsy Veldman
Erin Lincoln
Maile Belles
Nichole Heady
Lisa Johnson
Dawn McVey
Debbie Olson
Heather Nichols
Melissa Phillilps
Michelle Wooderson
Niki Estes
Thanks for stopping by!
 {Love} Marshmallow gift set
Stamps - Love Tags (to be released 12/15/10)
CS - White, Kraft, Raspberry Fizz
Ink - True Black, Raspberry Fizz, Summer Sunrise, New Leaf
Ribbon - Summer Sunrise
Die - Medium Scalloped Border
Packaging - Frosted bag
{Love Much} card
Stamps - Love Tags, Little Bitty Bird (both to be released 12/15/10)
CS - White, Soft Stone, True Black
Ink - True Black
December 13, 2010
Love Tags
Oh, man.
It's your lucky day.
Another group post by all the gals at Papertrey Ink.
Sweet.
Today's post is all about this month's brand new Love Tags set. This is such a fun set! Perfect for lots of quick and easy tags and cards for all those Valentine gifts, sweet little birthday presents, wedding gifts... and on and on and on. The images and sentiments could be used for so many different occasions... really versatile.
I'll start with Valentine's Day, though, because this gift is so sweet...
seriously.
It's made of sugar.
It's actually sweet, I swear.
Subscribe to:
Post Comments (Atom)


18 comments:
There you go again Jess... being fabulous! Love every fun detail and such a smart girl to use that impression place like so! I'm so happy you've joined the team!!!
Very fun!
Super colors, super mod style, the 60's are back!
once again!! stunning projects, I especially love the second one, its so creative!!! I do enjoying putting my perfectionist side aside now and then..:P
These are all stunning. The tag you've used is my favorite in the set & your creations are amazing.
Oh clever girl you are! Love the packaging and I'm a marshmallow girl myself so I'll be trying out your recipe for sure! You creations are amazingly pretty.
I love that card with the "imperfect" circles! The imperfection is what makes it so perfect! That is an amazing idea. Love it!
While I kind of thought that making your own marshmallows was a colossal waste of time, the fact that you can add peppermint seems like it might be worth it. Thanks for sharing.
Oh so fun, Jess! And funny. I always come for the funny :) Another super mod and cool and unique group post from you!
Mmmmm, your marshmallows look so YUMMY! Love your projects today Jessica!
I DO remember the Popples! I was in the toy store and saw one of those Pillow Animals they have now and said hmm is this the new version of Popples of course my kids had NO idea what I was talking about Ha... Now this post is just full of yumo goodness :) Love it!
Great additions to the love note set Jessica!
OK, I got destracted by the homemade marshmallows (which I actually tried this year too!!!) but then I came back. Can't wait for the big reveal tonight!!!...welll, officially tomorrow, but you know what I mean...
I know exactly what you mean about "imperfect" cards. I bet you were really questioning yourself as you made this one. It is spectacular. I especially love how you created the tag. Great job on this one. I loved it.
I love everything you are doing!! Your card yesterday for the group post was my fave (even put that in my post on Nichole's blog)! But seriously... homemade marshmallows?? I'd never eat anything else again. I couldn't even click on that link :).
Love your card! What a super fun way to use the impression plate! I am so tempted to buy it, just so I can try your technique! =)
Just what I needed: some eye candy from Jess!
love the cards.
Not only do i remember popples, I still have one. I found it about 4 years ago at a tuesday morning. Had to get it due to the fact that it was my all time favorite toy when i was little besides the lightbrite (don't think i spelled that right sorry).
LOL! Thx for the shout out. As I was reading, I was thinking 'omg, popples...I remember those!' Too funny, although I never made the marshmellow comparison. Peppermint marshmellows sound to.die.for!
***giggles***
I think I need to taste/make those marshmallows!!
It's all darling!
Post a Comment