
 So cute, right?
So, here's the deal.
You all know that I have a homeschooling first grader.
So I'm Mom.
And teacher.
And teachers (and Mom's) have treats.
Because students need said treats for incentives to do well.
So this teacher/Mom has a little treat jar and I dole out the goods at my discretion.
But sometimes... my student doesn't really need a treat.
Sometimes he just needs a little encouragement.
So I've added a bit of encouragement to my treat jar :)
I started with this month's new Tiny Envelope die and Oh. Good. Grief. It makes just the darned cutest tiny envelopes ever.
I thought I'd walk you through the process, just to make things quick and easy for you.
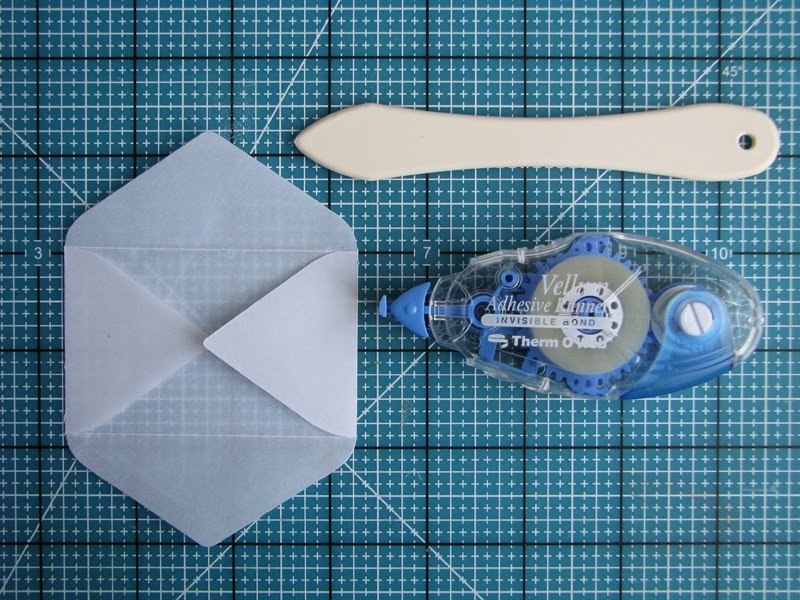
First up, here's how you want to cut your paper (I used vellum) to maximize the number of cuts you can get from one sheet. You can get two die-cuts per panel with this arrangment.
So cute, right?
So, here's the deal.
You all know that I have a homeschooling first grader.
So I'm Mom.
And teacher.
And teachers (and Mom's) have treats.
Because students need said treats for incentives to do well.
So this teacher/Mom has a little treat jar and I dole out the goods at my discretion.
But sometimes... my student doesn't really need a treat.
Sometimes he just needs a little encouragement.
So I've added a bit of encouragement to my treat jar :)
I started with this month's new Tiny Envelope die and Oh. Good. Grief. It makes just the darned cutest tiny envelopes ever.
I thought I'd walk you through the process, just to make things quick and easy for you.
First up, here's how you want to cut your paper (I used vellum) to maximize the number of cuts you can get from one sheet. You can get two die-cuts per panel with this arrangment.
 After playing around with the tiny envelope die, my suggestion is to use it with the embossed lines on the inside. That means you'll want to fold the envelope flaps in and over the embossed lines, so that those lines end up on the inside of the envelope. {One tip... if you end up with any stray marks on your die-cut - from your die, etc - a little rub from a white eraser should take care of that.
 Use a bone folder and this magic adhesive to fold up the flaps and stick them together. The magic adhesive is otherwise known as "Vellum Adhesive" by Therm 'O Web. It is *amazing.* Seriously. It just dissapears into the vellum when you press the sides together.
 And if there's any adhesive left along the edges, just run a little adhesive remover
over the edges.
And if there's any adhesive left along the edges, just run a little adhesive remover
over the edges.
 And then you can make these cutie pie notes to go in them :)
 The stitched heart is from Tiny Tags. I also used an image from the Ribbon Tails set at the bottom of the tiny notecard. I totally love the bold image and the color it adds.
 I love how the tags just totally dress each envelope up! Eli just loves getting mail or notes of any kind, so I just know that he'll enjoy untying each one and reading the little note inside {all by *himself,* of course}. I left them blank for now so that I can fill them out when he does something really special, or when he just needs a little pick me up.
 On the back of the notecards I added a strip of the new Ginghham set. No rhyme or reason on the color pairings...I wanted each card to be super fun for Eli to open up, so I mixed and matched the colors from the front and back images to the tags.

 And look... they even look cute from the otherside :)

 I tucked my little love notes into my treat jar to have on hand should the perfect opportunity come up this week. I left the twine a bit loose so that I can just wiggle it off to write on the card, then slip it back on.
 Ready to go! I have a feeling Eli is really going to like getting his own special notes, so I'm thinking I'll probably need to go ahead and whip up a few more.
And for more cutie pie projects using Tiny Tags, be sure to check out the rest of the design team...
Ready to go! I have a feeling Eli is really going to like getting his own special notes, so I'm thinking I'll probably need to go ahead and whip up a few more.
And for more cutie pie projects using Tiny Tags, be sure to check out the rest of the design team...
Nichole Heady
Betsy Veldman
Erin Lincoln
Maile Belles
Lisa Johnson
Dawn McVey
Heather Nichols
Melissa Phillilps
Michelle Wooderson
Danielle Flanders
Later, friends!


19 comments:
I love the idea of notes with teeny tiny tags! Just the smallness of them makes them extra cute!
Love the little envelopes with the little note cards inside! I gotta get my hands on those products. But I'm sure once I start, I won't be able to stop! Dying of cuteness here!
I love the little notes for your son! So sweet! So many wonderful new PTI products each month! :)
Great set of notecards. Good to have on hand! They are adorable.
Oh, this looks so adorable!! Wonderful with the tiny envelopes and the cute little tags! Fun!
Hugs, Wendy
Oh spectacular idea, Jess! And I love how sweet they look in those little vellum envelopes. The envelope die was just about 1 of the only things that was going on to the "Wish" list and not the "Buy" list tonight! You are making it haaaaaaaard! :)
Not only is this A-DOR-ABLE it's a brilliant idea! Also Loved the tutorial.
Jessica, how clever of you! I love these tiny encouragement notes! My kids are grown and on their own but I homeschooled them through elementary and part of jr. high. I did pass out notes of encouragement but none as cute as these!!
These are adorable and a great idea. Love them in the vellum envelopes. TFS
Jessica -
What a sweet idea! These are adorable. I think they would be a great gift for someone.
Elaine Allen
so sweet! i love it! i'm gonna have to go get that die.....now! :)
A wonderful idea. This could be used by grandparents, aunts and uncles as well. A jar of little "I love you's". Wonderful idea today. Thank you.
Great idea!! You are prepared!
Those little notes are adorable and your little student will love them!
The notes in the jar are such a cute idea. Thank our for sharing!
What super sweet little creations!
Love the little notes with the tiny tags! So cute!
Love this idea! Eli is sure to love receiving these and finding out what special note is inside ;)
Hugs, Ruth S
Hi Jess, these cute cards and tags are fabulous! You've solved a problem I've been pondering about closing tiny envelopes ~ the finished look with a tag is just perfect. Thank You!
Post a Comment